Hardware
 |
| click picture to enlarge |
With the camera came a basic tripod which we had previous experience in using. This was incredibly easy and portable to use, and became essential to our sequence. For example, in this wide shot we needed the tripod to keep the shot level:
However, due to the fact that the tripod was quite stiff, it was difficult to take successful pans and therefore led to some shots having to be done hand-held which we did not intend to use. This made some camera movement unintentionally jumpy/shaky, as seen below:
 |
| shaky hand-held pan |
Some hardware that we had never used before was the Arri Lighting Kit. Before using this, we had a short tutorial on how to use it safely and effectively. After having the tutorial, it was up to us to experiment with the lighting kit during the practice shoot in order to ensure that we knew how to use it effectively for our final shoot. From using this lighting kit, we learnt that lighting can greatly affect the quality of shots, especially interior ones.
Here are some positives and negatives that we experienced from using the lighting kit:
  |
| click pictures to enlarge |
The lights came with some filters available to use. After having tested these out, we decided that we did not need to use them for our opening sequence as we wanted a natural appearance to the shots, conforming with the style of similar products for example Skins. In addition, we knew that we could apply any effects that we wanted later in the grading part of post-production.
Despite our success with the lighting kit, we did face the problem of placing it successfully in the small room. In this shot, one of the lights is actually visible in the corner of the shot:
Software
In order to edit our film opening, we used Adobe Premiere Pro. As I had used this program multiple times before, I was relatively confident in using it.
However, I soon discovered that I had been using this software on quite a basic level. I learned how to grade our footage in a more in-depth way than I had done before, using the three-way colour wheel. This meant that we could carefully create our intended grading effect while ensuring that all footage had the same kind of appearance and style. This is how we graded our shots:
Despite our success with the lighting kit, we did face the problem of placing it successfully in the small room. In this shot, one of the lights is actually visible in the corner of the shot:
In order to edit our film opening, we used Adobe Premiere Pro. As I had used this program multiple times before, I was relatively confident in using it.
 |
| Timeline on Adobe Premiere Pro |
 |
| Grading (click here to enlarge) |
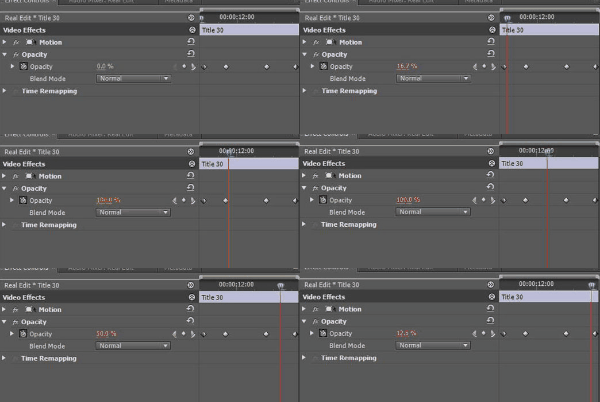
One of the most the most useful skills I learned was how to make titles fade in and out, giving our titles a more professional look. This was done by changing the opacity % at different stages of the title's appearance, as shown below.
The editing is shown on the left and the effect of this can be seen on the right:
Most of our titles were created on adobe premiere pro, however, we created two of our titles using Adobe After Effects. This program was entirely new to me so learning how to use it greatly improved my technical skills. The following title was created by going through the shot frame by frame and drawing a mask around the text in each frame. This made the title disappear as the character runs past:
We also used LiveType to produce the title 'GEMM Productions' and our film title 'Consequences'. This meant that we could apply interesting effects to our titles rather than just fading them in and out. LiveType was very easy to use as it worked in a similar way to the other programs, based around a timeline.


Facebook:
Facebook proved incredibly useful throughout our project. We used it as one of our main ways to communicate with each other when not in school.
 |
| How we used Facebook to communicate as a group (click to enlarge) |


No comments:
Post a Comment